 |
| How to Install Linux Mint 20.1 Ulyssa Xfce 64 |
Get a glimpse of linux mint
Before we install linux mint 20.1 Ulyssa Xfce 64bit, it's good to know what Linux Mint is all about.
According to wikipedia, Linux Mint is a community-driven Linux distribution based on Ubuntu which itself is based on Debian, and bundled with a variety of free and open-source applications. It can provide full out-of-the-box multimedia support for those who choose to include proprietary software such as multimedia codecs.
On some experiences that have been shared on the internet, linux mint is lighter than ubuntu, especially Linux Mint xfce.
Preparation before installing linux mint
- Download the ISO installer file from the linux mint official website.
- Prepare the Installer media, you can use a cd/dvd or usb flashdrive.
- Make the installation media so that it becomes bootable. You can use several methods to create a bootable usb flash drive
here are some instructions on how to make a usb flashdrive installer :
Easy Ways to Create Bootable USB Flash Drives
Video :
Easy Ways to Create Bootable USB Flash Drives Part 3 With CMD
Video :
Step by step Linux Mint 20.1 Ulyssa Xfce 64 installation :
 |
| Linux Mint 20.1 Ulyssa Xfce 64 first boot |
select "start linux mint"
You will see a desktop display, and there are several icons
 |
| Install Linux Mint 20.1 Ulyssa Xfce 64 |
select "Install Linux Mint"
after you select "Install linux mint" you will be asked to set some basic configurations, such as: language, keyboard configuration, location and username password
just my advise
Avoid using an internet connection when you install, as this will create updates during installation. So it takes a lot of time when installing Linux Mint, if you have fast internet connection it will be ok.
 |
| Choose your installations language |
Select the language you will use when installing linux mint
 |
| setting keyboard layout |
do some settings for your keyboard layout
 |
| Install multimedia codecs |
check the install media codec box, this will make it easier for you to be able to play audio and video files later.
 |
| Installation type |
select the option above that I circled, if you have no other partitions on the same disk or you want to use the entire disk for the Linux Mint installation
 |
| Choose Installation Partition Method |
Select something else if you want to set the type or type of partition you want, so it won't interfere with other partitions that are already on your disk
In this tutorial, I will choose something else, so that I can manage the partitions on my disk.
You can skip this step if you choose "erase disk and install Linux Mint"
 |
| Create Partition |
Choose New Partition Table so you can arreange your disk
 |
| create partition |
just click Continue
 |
| partition has been created |
free space has been created
click freespace, then press the + button, to create a new partition
 |
| creating swap linux partition |
First, create swap partition
Visit link below if you need info about swap partition :
How Much Swap Should You Use in Linux?
 |
| create root or /root partition |
Now, create one partition for root, use ext4 for this partition
 |
| create home or /home partition |
Create one more partition for home or /home, use ext4 for this partition
By creating your own home partition, you can separate your files or data from the system files of the operating system. That way, you can do data or file management more easily.
So that when you want to do a system update by doing a direct upgrade, you don't need to worry about possible errors that can make your files or data lost because they are on the same partition as the system files of the operating system.
 |
| partitions has ben created |
Now, you have 3 partition, klik "Install Now" button
 |
| select location |
Select your location, then click continue
 |
| create username and password |
Now is the time to create username, password etc. In this tutorial i choose "Log in automatically", the reason is... you can read that on the picture..
 |
| the process of installing Linux Mint |
It will take 10-15 minutes, by the time I installed Linux Mint on my netbook, it took over 30 minutes. Because it only uses 2GB of RAMs and an Apollo Lake processor.
 |
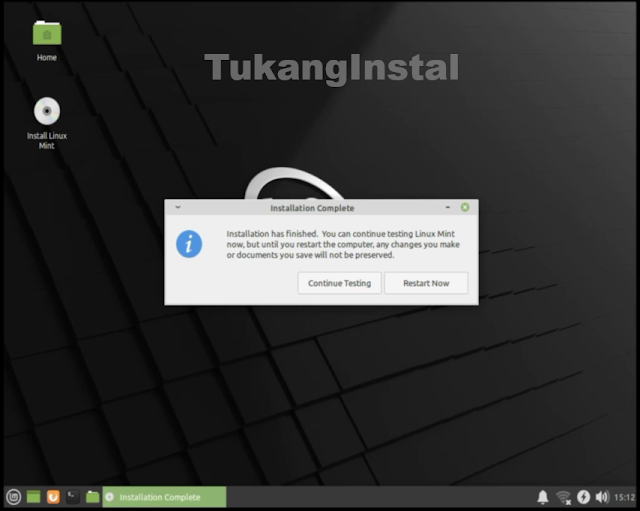
| installation Linux Mint 20.1 Ulyssa Xfce 64 Step by Step complete |
When the installation Complete, you can keep testing or restart you PC
Now you can use Linux Mint 20.1 Ulyssa Xfce 64 on your PC Desktop or Laptop
I hope this little tutorial about Linux Mint 20.1 Ulyssa Xfce 64 Step by Step, can help you installing Linux Mint 20.1 Ulyssa Xfce 64 Step by Step.
Or you can watch the tutorial of Installing Linux Mint 20.1 Ulyssa Xfce 64 Step by Step below
