Various errors often occur in Windows. One of them is that Windows cannot connect to the printer. As a result, those of you who will print various documents are hampered by this problem. Windows that are not connected to the printer will generally display a notification "Windows cannot connect to the printer".
Some of the causes include problems with the printer driver or users who are still using an older version of Windows. If you experience something similar, don't rush to take it to the service center. Try to solve this type of error in some simple ways.
Table of Contents
What are they? Here are some ways to overcome "Windows cannot connect to the printer".
The print spooler service feature functions to save your work until the printer is ready to print it. To solve the Windows error that cannot connect to the printer, you can try to overcome it by restarting this feature.
You have read 6 Easy Ways When Windows Doesn't Connect to Printers
1. Run the troubleshooters feature in Windows
Windows provides troubleshooters features to overcome various errors that occur in Windows. One of them is Windows which is not connected to the printer. Here's the tutorial.
- Open "Settings / settings" in Windows
- Search in the Windows search box for “Troubleshoot”
- Click "Additional Troubleshooters" Select "Printer"
- Then click "Run the troubleshooter"
- Wait until "Run the troubleshooter" finds and fixes errors that occur when Windows does not connect to the printer.
2. Restart the print spooler service
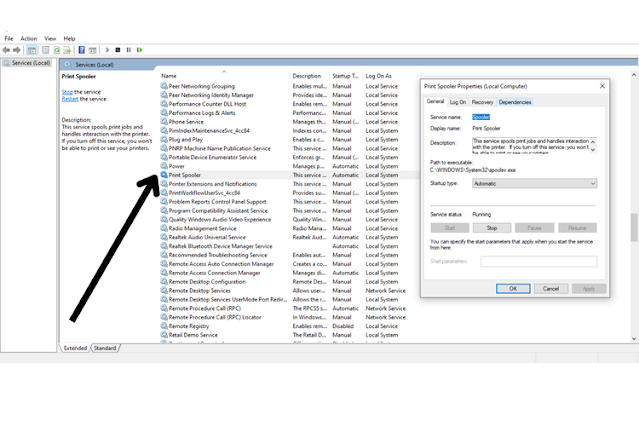
The print spooler service feature functions to save your work until the printer is ready to print it. To solve the Windows error that cannot connect to the printer, you can try to overcome it by restarting this feature.
- Press the Windows shortcut key + R simultaneously.
- Type in the “services.msc” column.
- Look for the “Print Spooler” feature and right-click, select “Properties”
- Click “Stop”
- Wait about 10 minutes and then activate it again by clicking “Start”
3. Update your printer driver
When you install a printer on your PC, Windows will also automatically install drivers that are useful for connecting the printer with your device. But sometimes the driver experiences various errors that cause printer problems.
One of them is "Windows cannot connect to the printer". To fix this you can update your printer driver. Here are the steps:
- Click the "Start" menu and type "Device Manager"
- Select "Print Queues" and click the printer driver you want to update
- Click "Update driver"
- Wait until Windows finds and installs the updated driver
4. Try reinstalling your printer
If you are still experiencing the "Windows cannot connect to printer" error, try uninstalling your printer device. After that re-install the printer. This method can overcome errors that occur in your Windows.
- Open "Settings / settings" in Windows
- Select "Printers & Scanners"
- Choose a regular printer
- You use Click “Remove device”
- After uninstalling the printer, reinstall it and follow the next installation instructions


